Turning a Basket
An advanced project for woodturners
Step by step procedure
This is a project that's just advanced enough, but yet quick enough to satisfy most experienced woodturners. There's some carving required, of course, but doesn't have to be a whole lot.
Learning the turning skills required for this project will allow for many more projects to come to mind. There's blind hollowing. Hollowing through a small (or large as required by the 'handles' of the basket) openings as well as carving.
Let's get started....
 |
This is a piece of Walnut about 3" diameter and 8" long. I won't use the full length but I like to have enough in case of ... ummm ... "design opportunity" striking. I have already rounded it and put a tenon on the end. |
 |
I flipped the blank end for end and put the tenon into the scroll chuck. I've also pulled up the tailstock for extra support. I like to do this as a matter of course for as long asI can just for safety even on small items such as this.. |
 |
I've formed a cone or what will look like the top of an egg shape on the right side. That will become the basket handles area. I've also made some parting cuts on the left side. These are to show where the bottom of the base will be. It helps me visualize it in the next steps... |
 |
I've formed a really rough base on the left side. This will be the bottom of the basket. I've also made a really shallow parting cut near the middle of the "egg". That rasied area will be the division between the basket "bowl" and the start of the handles. You can go ahead and round off that raised area a little to form a bead. Don't have to at this point but you can. |
 |
Pull the tailstock away and using whatever tool you want (I used the toe of a skew), put a little dimple in the end of the blank. This is to help center the drill bit next .... |
 |
Drill a depth hole with a drill bit.
You don't have to do this but I'm hoping Tom Crabb will
read this at some point. I teased him awhile back about
if he could use a drill bit for this or that. He
wondered if I sold drill bits or something! haha
Anyway, I'm using just a hand drill but you can use a Jacobs' chuck in the tailstock if you wish. Drill it down near to what will be the inside bottom of the bowl portion. |
 |
Spilling its guts! Very small hole and a lot of fine shavings. Yes, this is hollowing and YES it's boring and time consuming. Start from the opening and work your way down the sides slowly. Just like with any hollow turning, you work the top to final thickness and work down from there. Don't go back to the top once you get past it. Yada yada yada.... |
 |
I'm using a modified scraper tip on an
old screwdriver. I certainly don't recommend using old
screwdrivers, files, etc. for most woodturning but for
small things, they work fine most of the time. I'm not
hanging over the toolrest much at all so it's safe.
Lots of digging out the shavings here. LOTS. Even on a small hollowing like this. |
 |
OK. All hollowed out. I don't make it
very thin at all. You want some thickness left in the
handles area so you can form the handles and not break
them all to pieces. I also didn't do a whole lot of
hollowing in the base of the basket. I'll get to that
later.
Here you can see where I've drawn some rough lines where the handles will go. On this particular piece, there were some cracks present near the hollowing hole so I had to work around those. I'll just cut them out and form the handles around them! |
 |
The other side. |
 |
Here is what I'm using for these small baskets. For the larger ones, you can use a jigsaw or handsaws such as a coping saw, etc. This is a carbide side-cutting bit that fits into my Dremel tool w/ flexshaft. |
 |
Cut in and move it around. Just go slow and keep your hands out of the way in case you slip or the wood comes off too fast. |
 |
|
 |
The handles cut out. Really rough here. |
 |
|
 |
Inside view. Before going any further, and risking damaging the handles after then get thin later, I now finish hollowing the bowl portion. |
 |
Go easy here! Don't touch those
handles. They're thick but not enough to not snap if
touched. Just hollow out as you were before. Actually,
it's easier now that you can see your tool as it passes
through those cut-out handles.
Here, I'm using a thick and long hex key wrench that I've ground a scraper tip on. |
 |
|
 |
Hollowing all done. I'm going to completely finish sand the bowl portion now. Once those handles are carved and done, you don't want to risk breaking them by putting a tool down there afterward. I'm using the Dremel again but now it has a flat rubber mandrel on it that I've glued some closed-cell foam onto and then a leather pad on top of that. The sandpaper is spray-glued to that. |
 |
Sanding ... sanding ... and sanding .... *cough* cough * cough* |
 |
Now on to the handles. |
 |
Pretty eh? ha! |
 |
I start off with a large size sanding drum on the Dremel. Rough grit. All I'm doing here is getting things somewhat the same thickness all around and starting to round off the handles so they're not so flat looking. |
 |
Oooops! See that handle at the top? I got too excited and put too much pressure on it. It snapped just a little. That's supper glue. No problem, though. You won't see it later. |
 |
Rough sand-shaped. |
 |
To get into those corners and small places, I use a carving knife. Go easy. |
 |
A small sanding drum with a fine grit. Final sand-shaping. Round things over and get rid of the rough sanding marks. |
 |
Done with fine sand-shaping. |
 |
|
 |
Here I'm using a progression of sandpaper to final sand. Here's a way to sand those rounded areas. On such small items, you can't get your hands in there everywhere so you have to be creative. |
 |
*cough * cough* |
 |
Careful when hand sanding too. Things are thin Support those areas as much as possible with your hands or even stuffing a rag in there (or balloons or foam or whatever) to support things. |
 |
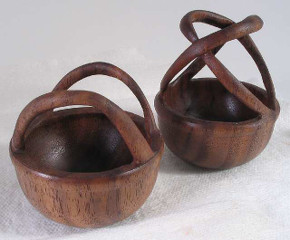
Before parting off, I had final sanded
the outside "bowl" portion of the basket. Here, I'm
sanding off the nub left behind.
That's it. Hope this helped. |