Vacuum Chucking on the lathe
Break free from rigid chucking. Learn the basics
Step by step procedure
And so then there was a knock at the door. It was the deliveryman with my vacuum pump. I had never used a vacuum pump before in my work with the wood lathe but I was quite interested in the new possibilities it promised to offer. So began my little journey with it. I've described a few of the things I've done to and with it so far.
I had never known it could be so useful ... or quite so dangerous, either. Any angle, any shape or form that I needed to hold onto the lathe in order to turn it, could be done. Of course, with that freedom and adjustability came the problem of repeatability. You also can't chuck of just ANY piece of wood. If it's too thin or porous, it just won't work. You'll lose too much air and it won't hold. I've imploded more than a few pieces and it's absolutely terrifying when it happens. Be forewarned!
 |
Here's the vacuum pump. It's a Gast 1/4 hp, 4.5 cfm, 220V, pump capable of drawing around 26" of mercury. It came mounted to a stainless frame and with the inlet and outlet filters you see. All I did was add an electrical switch and a 1/4" elbow to the inlet filter. You can see the clear reinforced hose come from it. |
 |
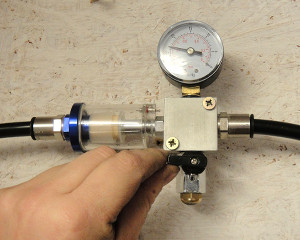
The hose then goes to a few fittings that you see here. It's positioned next to the lathe so it's easy to reach and read while working at the lathe. I'll mount it on a board behind the lathe soon. You can see the vacuum gauge I got from Grainger for around $7US. Also there's a 1/4" water gate valve. That's for adjusting the pressure. I used this kind of valve because it takes a few turns to fully open or close it. This gives a great deal of control in just how much vacuum I want to get. To slowly decrease the pressure, I simply let a small leak into the system at this valve. This is how I mount and unmount turnings instead of starting/stopping the pump. |
 |
From the fittings in the above picture, the tube goes to my homemade rotary fitting. It's just a block of wood with a bearing (the dark ring is part of it) that has an NPT fitting in it. The block of wood, on the other side which is butted up to the hollow spindle on the handwheel side. The block of wood spins with the lathe but the bearing just spins and keeps the hose from wrapping around (at terrific speeds!). |
 |
Here's a wider view. |
 |
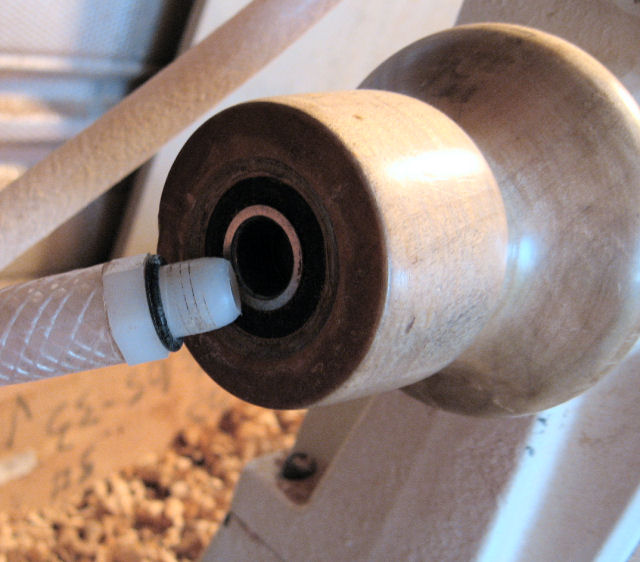
On the other side is where the threaded lamp tube (used for making/repairing lamps) comes through the spindle to the working end of the headstock. I've used a tapered washer that fits both the tube on the inside and the Morse Taper #2 on the outside. The lamp tube screw fits snug up to the washer and holds the whole thing together. I'll have to add a drawing of this part of the system soon..... and here it is! <grin> |
 |
|
 |
Here's a wider view from this angle. You can also see a simple and small vacuum chuck I made. |
 |
UPDATE
|
 |
|
 |
|
 |
|
 |
|
 |
|
 |
|
 |
|
 |
|
| END UPDATE | |
 |
Here's the same chuck but without the rotary adapter in the spindle. It's just a homemade screw-on wooden faceplate that I modified to work for vacuum work. I just hollowed out the inside to reveal the hex nut. I rounded the outter edges so it wouldn't mar the turnings used on it. I also added some closed-cell foam to get a good seal. This is about the minimum size of vacuum chuck and only certain things can be held on it. The greater the surface area that the vacuum is acting on, the greater the hold (pressure exerted for a given level of vacuum). It holds spheres and some eggs for sanding but not much cutting with the tools. |
 |
Here's the backside of the large faceplate vacuum chuck. It's just a hex nut (1" x 8 tpi in the case of my Jet Mini lathe) glued with a polyurethane glue into a recess of a maple board. This arrangement works quite well and is strong. |
 |
The front side. Just a small hole is all that's needed. What's not shown is the closed-cell foam that covers this face of the faceplate vacuum chuck. Bowls or other turnings with continuous and even rims (not natural edged pieces) work well on this chuck. It takes a bit of fiddling to get the piece on there just perfect though. |
 |
Now, I'm starting to make what I call the "long neck vacuum chuck". It's designed to reach down inside of a bowl or other turning in order to get a nice, round, continuous place to get a good seal. Things like natural edged bowls for instance. You need the long "neck" (the white PVC in the picture) to give you clearance so the rim of your turning doesn't hit the headstock or even the chucks' base. So, I start out by measuring the PVC diameter. |
 |
I then take one of my homemade screw-on wooden faceplates (with a hole in the middle of it) and cut a grove to match the PVC's diameter. |
 |
There it is. The faceplate is about 3/4" thick so I made the groove around 1/2" deep. I tried to make it so it's a very snug fit for the PVC pipe to fit into. However, at the bottom of that groove, I made it a little wider than at the top (near the outside) of the groove. I did this so that it would give the glue a little more "bite" and surface area to hold onto the wood. |
 |
About to be mated. (The song "Together .... Forever ..." is going through my head right now. Yes, it's sick and twisted but then I've been smelling fumes most of the day!) |
 |
Here's the glue I used. It's just a polyurethane. Brand doesn't make much difference. I've found that polyurethane glues do well when bonding dissimilar materials such as metal / wood / plastic and so on. You get foaming but it's not a problem in this case. |
 |
Spread the glue in the groove. |
 |
Pop the PVC neck in there. |
 |
A view from the inside. |
 |
I let that set up for a couple of hours and then go over the PVC / wood joint with more poly glue. |
 |
Inside too. |
 |
After overnight, it foams up and it's set. Not pictured is the closed cell foam that I put on the PVC rim so it doesn't mar the woodturnings. By the way, this chuck works VERY well for balls/spheres but they have to be sized just right so that they just barely slip inside the PVC. Enough to get a good bit of suction on them but not enough that it gets sucked too far inside and you can't work on them ... or get them out! |
 |
That's it! Well, not quite. The last step with any vacuum chucks (or any of the wooden fixtures in the system for that matter) I make is to seal them. Yes, wood is porous to some degree and I want to eliminate any leaks from the system. So, I simply coat all of the wooden parts to the vacuum chucking components with a film building finish. I'm using just a few coats of a wiping urethane (thinned polyurethane). It seals the wood so air won't escape from that direction. Please Please Please do wait until the finish is really dry. If not, you'll get some of that gooey finish sucked right into your vacuum pump and/or filters. Nasty and could ruin your pump! |