Turning a Wooden Skew
Make a skew ... with a skew!
Step by step procedure
I'm kinda known for my work with the skew (among other things!) for woodturning. I get from them and also give a lot of good-natured grief with my woodturning friends about skews. Some time ago, I started giving these as gifts. In fact, I'm going to be giving this batch of skews to the outgoing officers of one of the woodturning clubs that I'm associated with tomorrow. So, keep it quiet for me for a little while, OK? These are really simple to make. It's even easier when you have a belt and disk sander to form the square steel portion. However, you can use a bandsaw to cut it out and just hand sand it from there. This is a block ( about 13" long by 2" thick square) of hard maple. You can use about any kind of wood though. This and the others ones of these had some spalting and worm holes but I think they'll work alright.
 |
This is a block ( about 13" long by 2" thick square) of hard maple. You can use about any kind of wood though. This and the others ones of these had some spalting and worm holes but I think they'll work alright. |
 |
Round it out with the tool of your choice. I used a 3/4" roughing gouge starting on the right side and working my way to the left. It's a whole lot easier than roughing the entire length all at the same time. |
 |
All roughed out. I checked for major splits and worm holes, etc. The worm holes weren't really visible here but do show up later (blasted, sneaky worms!) but I decided to just leave it. I'll make up some story to the recipient about it later. hehe |
 |
I start out by figuring out where the junction of the handle and the "steel" portion is going to be. I feel like the handle needs to be more or less a regular size and the steel part can be a little shorter if it has to be. Hey, it's been used and sharpened! |
 |
I then go to the handle and rough it out. I used the roughing gouge here too. Make whatever handle style you want. |
 |
A refining of the shape of the upper handle area. By the way, this is very much the same thing (and good practice) as making a real handle for an actual tool. |
 |
Once I have everything the way I want it (at least roughed out), I go to the steel portion again and form the ferrule. Normally, the ferrule will be some piece of brass or something similar but we're making it all out of wood. |
 |
Then, I take the steel portion down to the final diameter and make it fairly smooth. Doesn't have to be really smooth because we're going to make this all square (cutting and/or sanding it that way) anyway. For skews, leave this pretty thick. |
 |
I then turn (yeah, I crack myself up!) to the handle again and turn it to final form. Personally, I use the skew to do that. The shallow and long sweeping coves/curves are great for the skew and you don't usually have to sand it to get a perfectly smooth surface. |
 |
Always work downhill or else you might get some tearout. You'll see that I am doing these cuts with the "toe" or long point "up" here. I tend to do that on these planing cuts as it keeps the handle of the tools closer to my body and the shear angle is so much better this way and gives a superior finish cut here. |
 |
The last thing, before parting off, is to make sure the ferrule area looks good and is straight. Also, if anything, make the junction between the handle and ferrule area just a tad bit undercut.. This gives the illusion, later on, that there really is a separation like in a real tool. |
 |
There it is. Just have to get it off the lathe now. |
 |
Here, I'm parting off with the skew. You could use a "parting tool" (it's actually a thin skew .... but I digress <grin>) but it leaves a poor finish on the bottom. The skew just has to be used and you'll get a surface on the bottom of the handle that is done without need for sanding. |
 |
Tada! And now to the bandsaw and/or sander or whatever you can find to do this with. |
 |
Is this like having someone over to your house and only after they're sitting at the table, realize that you have your underwear hanging on the lamps and all over the floor? Yes, that sanding disk is WAY too loaded and needs to be replaced. Or is it just me? Hmmm..... |
 |
OK, I'm over it now. A low grit and a soft touch will form that round "steel" portion into a square section. Forming the bevels is just like doing it in actual steel. Well, a whole lot faster and easier though. I go up to about 220 grit on the steel portion. That gets me the right look of "steel" once I color it next. |
 |
So, is it really just ME? No, couldn't be. I mean, come on folks. Give me a break. It's not like their ALL over the place! No, really. |
 |
Yeah, ok. So I just went and made sure the place was cleaned up. At least you can come over now. Oh, and I did change that loaded-up sanding disk paper. Very soft spalted sweet gum (from a different project) really sticks! |
 |
Here's what I use to make the "steel" and "ferrules". I got them from the crafts section at a major national retailer (is that coy enough?). The "steel" portion is done with the silver color and the "ferrule" is done with the gold. This stuff is really just gold and silver powdering in a soft wax. Lasts quite a long time. |
 |
Take your finger and rub it in. Let it dry some and rub it vigorously to create that cool "steel" patina look. |
 |
See that blasted worm hole? RIGHT in the way? Yep, I planned it that way. The cool thing is that hole goes all the way through and out the other side down the steel a bit. |
 |
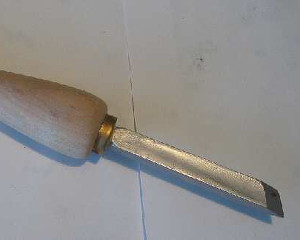
A nice steel look. |
 |
The ferrule is tricky because you don't want to get the coloring on the handle. I just do as much as I can safely do with my fingers and then take a toothpick to get into the tiny areas. |
 |
|
 |
You can either cover the entire portion of the ferrule area up to the "steel" or just a little bit on the end. You know, as if the ferrule was just about 1/16" thick and you can see the wood between the ferrule and the steel. Whatever works for you. |
 |
I have no idea why this picture is here. |
 |
Because that's it folks! Remember, keep it to yourself for a day or two until I can give these out. |