Projects from Limbwood
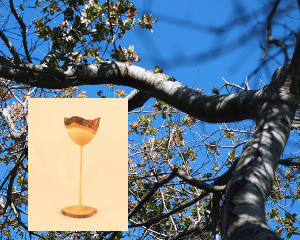
Natural Edged Goblet
Step by step procedure
Woodturning doesn't always involve expensive or large pieces of wood. Often, you can make many beautiful and functional things from just limbwood. That's right, just from your trees' limbs!
Here is another great project. This one is really one for the advanced turners. It's a natural edged goblet. Very thin stemmed!
Let's see how a friend of mine, Joe Traynham, does it. Credit goes to Bob Baker for taking the photos.
 |
Starting with just a couple of pieces of limb wood from Pear. |
 |
Joe starts out by turning the limb between centers. He's making a tenon on one end in order to grab it with a scroll chuck. |
 |
The limb is being held by the scroll chuck now. He's hollowing out the cup portion of the goblet with a shallow gouge (spindle gouge). Start from the outside rim cutting into the center. |
 |
Sanding and more sanding. |
 |
The completed inside of the cup after being sanded and finished. |
 |
Starting to work the outside of the cup. Finding the right form here is important before moving on. |
 |
Roughing out the stem and base. Notice
that Joe has now pulled the tailstock up to support the
cup while he works on the rest of the goblet. He's
installed a live center in the tailstock and placed a
rag between it and the wood to prevent marring.
Also notice that he has already made a shallow parting cut near the scroll chuck. This is to help him visualize the end of the base when he's working on that end. |
 |
Explaining things as he goes along. |
 |
Here's a confused demo attendee (he's a "flat-lander" afterall) about to ask a question. |
 |
Carefully taking down the stem. |
 |
|
 |
A reversed view. |
 |
Joe had a few people watching his work. Somehow it doesn't seem to bother him. |
 |
Ahhh those wonderful thin ribbons of wood coming off the tool! Gotta love that. You can see here that Joe takes the stem down to almost final thickness before moving on down the stem toward the goblet base. |
 |
Taking it easy so you don't snap that thin stem. |
 |
Once you get down to this thin of a stem and especially with a large cup on the end of it, you don't want to stop the lathe until you are totally finished and parted off. Why? Because the startup of the lathe could twist that cup portion right off at the stem! |
 |
Joe doesn't mind people getting up there close to see what's really going on. It's a great way to learn. Just don't wave your hands in front of his face ... he hates when I do that. <grin> |
 |
|
 |
Joe is going back to the almost finished portion of the stem and cleaning it up before going any further down the stem. |
 |
He's getting in close there. |
 |
Here you can see that the base has been formed and now the rest of the stem is being cleaned up to flow smoothly between the rest of the stem and the base. |
 |
A little sanding is all it takes. Be VERY careful here. Too much pressure can snap that small stem. |
 |
Applying some friction polish. Again, very carefully. |
 |
Starting the parting off procedure. Joe is using a very thin-kerf parting tool. |
 |
Once you get down to where the piece wants to flutter around, you need to pull the tailstock back and out of the way. Carefully grasp (more like cradling) the goblet with one hand while continuing to part with the other hand. Watch out for any clothing that might get caught in the spinning chuck! |
 |
The completed Natural Edged Goblet. Well done, Joe ! |